blobbottlebob
Well-Known Member
Hey everybody,
I am going to give free bottle cleaning advice! I want to share some information with you about how I clean bottles. There are no trade secrets here. For many of you experts, this is too remedial. Sorry about that. I'm hoping that it will help at least some collectors.
SKIP THIS GREY PART IF YOU HATE LECTURES!
A little about my cleaning philsophy. I believe that a little sickness may be part of a bottle's unique history. Sure, I love to get mint examples. However, trying to make a damaged bottle mint often results in it being damaged differently (in my opinion). I do not use any power tools, acid, vinegar, oils, sealants, or tumblers. I just get the dirt and stains off the best I can. I give that dirt hell! (And then I live with the rest). I actually enjoy seeing a rainbow of irridescence on the surface of an antique bottle. I also love the faint curved lines of etching found on a privy bottle. I prefer this matted patena to the glossy oiled surface of an over-cut, over-tumbled piece. I believe that I am the caretaker to the history of the bottles that I own and that it is my job to do no harm to them. I should preserve their history (to the best of my ability). I should let them sparkle in the sun on the window sill. Okay. I got carried away. I'm off of the soap-box. On to cleaning.
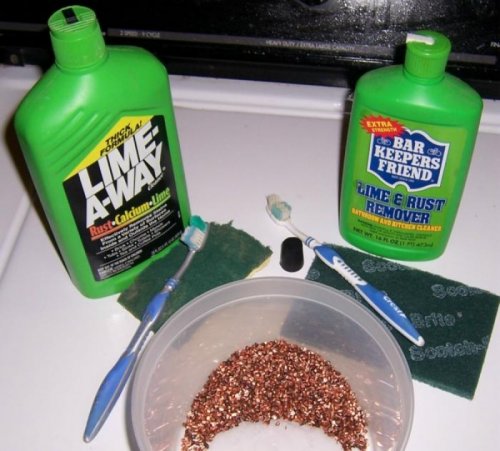
SUPPLIES. This first picture shows the materials I use. The cleaning agent I prefer is some type of lime remover. I have heard raves about denture cleaners (but I have never tried them). For the surface of a bottle, I typically use two things. A scotch brite pad and an old toothbrush. I have never scrubbed hard enough to damage a bottle with either. For the inside, I use cut copper wire. It comes from heavy gauge wiring (like 12 or 14 gauge). The coating is stripped off of the wire and it is cut into small pellets (maybe 1/8 inch long). This can be done with a hand held wire cutter but there are machines that can accomplish this as well. Basically, people who tumble bottles use this type of copper.
THE METHOD. I add approximately a pound of copper to the inside of a bottle and then I squirt in the lime remover. I use enough of the lime stuff to moisten the copper without drowning it. For some bottles with an intact closure, you can simply re-seal the bottle with the closure. For others, I put in a rubber plug (or seal the top off with my thumb - make sure to rinse your hand promptly if you do this). Next, I proceed to shake the copper-lime mixture over the dirty, stained area. If I want to get really serious, I put the dirty side down away from my body. Then, I shake it violently up and down (like I'm shaking a martini mixer). This gives some pretty good contact with the stain and can usually remove almost any kind of dirt, scum, algae, residue, and stain. It does not always get the heavy etched on mineral deposits. However, it will usualy lighten them to a less offensive whitish color.
This first picture shows the supplies. If you had to buy it all, I'm guessing it cost you ten bucks (plus whatever copper costs nowadays). The copper lasts a very long time. Over time, though, it does get slightly rounded by all the contact with the glass and does not 'scrub' as well anymore.

I am going to give free bottle cleaning advice! I want to share some information with you about how I clean bottles. There are no trade secrets here. For many of you experts, this is too remedial. Sorry about that. I'm hoping that it will help at least some collectors.
SKIP THIS GREY PART IF YOU HATE LECTURES!
A little about my cleaning philsophy. I believe that a little sickness may be part of a bottle's unique history. Sure, I love to get mint examples. However, trying to make a damaged bottle mint often results in it being damaged differently (in my opinion). I do not use any power tools, acid, vinegar, oils, sealants, or tumblers. I just get the dirt and stains off the best I can. I give that dirt hell! (And then I live with the rest). I actually enjoy seeing a rainbow of irridescence on the surface of an antique bottle. I also love the faint curved lines of etching found on a privy bottle. I prefer this matted patena to the glossy oiled surface of an over-cut, over-tumbled piece. I believe that I am the caretaker to the history of the bottles that I own and that it is my job to do no harm to them. I should preserve their history (to the best of my ability). I should let them sparkle in the sun on the window sill. Okay. I got carried away. I'm off of the soap-box. On to cleaning.
SUPPLIES. This first picture shows the materials I use. The cleaning agent I prefer is some type of lime remover. I have heard raves about denture cleaners (but I have never tried them). For the surface of a bottle, I typically use two things. A scotch brite pad and an old toothbrush. I have never scrubbed hard enough to damage a bottle with either. For the inside, I use cut copper wire. It comes from heavy gauge wiring (like 12 or 14 gauge). The coating is stripped off of the wire and it is cut into small pellets (maybe 1/8 inch long). This can be done with a hand held wire cutter but there are machines that can accomplish this as well. Basically, people who tumble bottles use this type of copper.
THE METHOD. I add approximately a pound of copper to the inside of a bottle and then I squirt in the lime remover. I use enough of the lime stuff to moisten the copper without drowning it. For some bottles with an intact closure, you can simply re-seal the bottle with the closure. For others, I put in a rubber plug (or seal the top off with my thumb - make sure to rinse your hand promptly if you do this). Next, I proceed to shake the copper-lime mixture over the dirty, stained area. If I want to get really serious, I put the dirty side down away from my body. Then, I shake it violently up and down (like I'm shaking a martini mixer). This gives some pretty good contact with the stain and can usually remove almost any kind of dirt, scum, algae, residue, and stain. It does not always get the heavy etched on mineral deposits. However, it will usualy lighten them to a less offensive whitish color.
This first picture shows the supplies. If you had to buy it all, I'm guessing it cost you ten bucks (plus whatever copper costs nowadays). The copper lasts a very long time. Over time, though, it does get slightly rounded by all the contact with the glass and does not 'scrub' as well anymore.