great works Ron,I was wondering if you do any finishing work on piece after gluing? like 400 (very fine) grit wet sanding and then use a polish compound like ZAM on buffing wheel to blend final product? I used to bevel mirrors and Chandelier crystals and have often thought maybe same technique could come in handy with repair.
SC
After the resin loses its tackiness (hopefully, I'm that patient), I've tried polishing with a polishing sheet (plastic) purchased from Michael's craft store... It can be used dry or wet... Results have been mixed... (Actually, if you check out my "repaired bottles, the sequel", the repair to the base of the Haskin's Saratoga resembled the honest wear of the base after I polished it)...
I'm not sure if anything more heavy duty would work... The resin might be forced out of the filled area under too much pressure...
Hi Ron! I did check out the sequel and the Saratoga (can you believe this is my second attempt at a reply and somehow I hit the wrong button and the other just poofed on me? 'puter's...I'll try again.) And I see what you are saying about it matching the glass. Especially on bottom where there is natural wear roughing it up. Kind of like frosted glass would look if the Haskin's was clear glass. That's kind of something like I do, and I thought I might add some tips on resin casting here, if it's ok with you?
I never have repaired any bottles, but we do a lot of casting (some pictures below.) I'm using my son as a model here.
(As I can't keep up with him I figure the least I can do is try to teach him as much as I can.)
Totally agree with all your post about safety and ventilation. I make him wear these gloves and safety glasses in the pictures. My wonderful wife is helping him add the hardening drops. I wanted to ask if you use the drops, or the other product on market where one adds 1/2 to 1/2 resin? I can't seem to find the 50-50 anymore, it was great for making the (faux) glass table tops. Anyway lots of fresh air. As I said I never have repaired bottles. But I hope some of these tips might help someone that is just learning (or wants to learn) resin casting. We mostly do paperweights. flowers, 4-leaf clovers, butterfly's, pennants, key-ring fobs, (and fake ice cubes with house flies and those darn Asian Lady Bugs embedded in them. (gag)
Even tho the pictures are not of bottles, there is a bottle collecting story involved here that I hope you will enjoy. so I've also included it. I thought maybe I should post it under the "unexpected discoveries" thread. I don't think my son will ever forget that day of this story. (he found his first Warner Kidney and Liver Safe Cure, perfect condition!) I'll explain the pictures in a moment.
I really wouldn't worry to much about heavy duty work forcing the resin out of the piece. The reason I asked, is because I do this quite a bit. Often times people pick up one of my pieces in the store and think it is real glass. It isn't. (we do some consignment on gifts and souvenirs) after making your form, just as you suggest, tape works as well as anything. I cut a rubber ball in half to do paperweight's like one in picture. Here you will have to work fast if doing several pieces. Pour in your mix. Follow the manufacturer's instructions. Blowing over the mixed resin and hardener will help break those little bubbles, if you don't want them. Depends on the glass you are trying to match, eh? Then (again as you said) be patient.
Then after work has dried. I use the technique I wrote of above. Starting with a medium grit wet and dry sandpaper, I will wet sand in Kitchen sink. My very wonderful wife will ask me if I need help scrubbing (same as she does when I'm washing bottles.) I work down in grit size, usually 400 medium fine-600 very fine, until under the water stream the work looks crystal clear. (this is cool because you can tell by your fingers if it is the shape you want it to be. Almost with your eyes closed.)
Now we have it all sanded down and set it off to the side to dry. It looks just like frosted glass. (But I wanted clear!) OK. this is what we do. Using an ordinary drill, or a Dremel. (myself I use a Fordom overhead flexshaft, same as Jewelry shops use, but any drill and a buffing pad will work, or a soft cotton cloth and a little bit of elbow grease.) And a good polishing compound. I prefer a product called ZAM. It is green in color, comes in tube form and can be purchased at some art supply or ALL lapidary stores. And a tube will last you a very long time. Apply the polish compound to your felt or cotton wheel and then lightly (doesn't matter how much pressure you use, you will see immediate results.) buff your resin cast project. Stop when-ever you get your desired luster. You may want to go back and wet sand again if you find flaws you missed during the first sand. It's a lot like what a tumbler does, plus the finish work. (I call that the "chase.")
Here are those pictures. (I hope this works) My son, adding the catalyst to the resin with Mom's help. The painted lady butterfly laying in the clam shell on table, was found that way on a sunflower in our garden, already gone, with wings spread. First we used rubber ball (cut in half to make the mold) And then half filled with resin. Now let that 1/2 dry (important not to let dust in this part of process, or it will be embedded to deep for sanding to remove.) then we add our specimen, on top of that we add more resin. Then after drying, we use the sanding and polish method I described. (tumbling would work the same, but you still have to finish to get crystal clear. Glass and resin differ that way.) Now, in the bottom pictures! This is my bottle collecting story!
Our dump (I call it ours because it is close to here and I discovered it back in the mid 60's) is on the side of a lovely little creek, called the Spring. In the summer it is clear and full of Darters and Shiners. A really great place to hang out and get away.
The creek bottom along the dump is covered with broken pottery pieces, Purington Paver's, and old things, so the experienced eye knows there is dump there.
My son is five years old at the time, and he is (as usual) exploring like a new pup let out in the yard. Turning over stick and stone in the creek, he stops and asks me what something was. I took a look and had never really seen anything like it before. I mean this thing looked prehistoric! Alive a squirming thru the water after son had disturbed it from the bottom of the rock or whatever it was attached to. About 3 1/2 inches long and maybe 8 legs on each side and some really large pincher's. Really ugly, and it's gills were on the bottom of it's stomach. Really!
Hey, I put it in our bucket with some water, and took it home, after we dug some more bottles (beautiful summer day) He got stuck in the mud (I make sure he is dressed right) and when i pulled him up out of the mud, he said look Dad a bottle. Sure enough, the Safe Cure.
We got home and I did some research thinking the bug was a helgrammite. It is, but actually a Dobsonfly larvae: http://tinyurl.com/6b4bh (The picture at this site gives a good description but the picture doesn't really show how big the pincher's are. Some other web-sites do, And I guess they really bite hard!) The one picture in bottom left shows it in our aquarium. The one on the bottom right shows it after it expired (We were hoping it would reach maturity) so it was preserved in this weight by resin cast. (same as any bug preservation use pins etc to keep them from curling, but you shouldn't cast fresh specimans, it can cause cracking or not curing from the moisture.) then cast and just shot the picture. I thought the paper weight long gone. But earlier tonight , everyone was still awake. I asked Mate the name of that bug. She told me and guess what? My son ran to his room and came back out with it. i guess he didn't forget. It's just amazing what you can find. And how each discovery leads to another. I'll post some pictures of our dump sometime soon, maybe in the Spring, right now it looks like a winter wonderland or a postcard. Sorry, everyone, about me being so windy! i hope there is at least one good tip in here somewhere for someone.
Ron, Thanks. I hope we can exchange more casting tips, As a newbie here, I would like to learn more about repair of bottles and apply that to preserving something good.
sc
I do use the casting resin with the hardening liquid that is added by drops... I usually just wing it...
Thanks for the response... Sometimes it's hard to get folks on the forum to respond at all, so don't apologize for sharing your thoughtful and useful comments...
I hope to post another series; this one is an Adirondack Springs in beautiful hammered emerald green... The bottle was flawless except for two large chunks out of the lip... I think the repair, tho not perfect, really gives the bottle new life as an unapologetic display piece...
Hi Ron! Thanks for the encouragement!! I mentioned in another post computer problems I'm currently having, meant to get back sooner but...
Winging it is best way to go. Every time turns out better. Waiting is the hardest part. I agree with you on saving a great display piece. I think I've thrown away so many that would look great for keeping purposes. I do have one aqua J. Walkers bitter's bottle with a slight chip on lip. I will put up a before and after picture of it before I start and after it is finished. If I don't mess up puter doing the f-disk and I also have to go 30 miles to town to pick up more resin (we have Ben Franklin's around here. They used to be five and dime but now they are strictly craft.) Btw, the other pictures are super!
sc
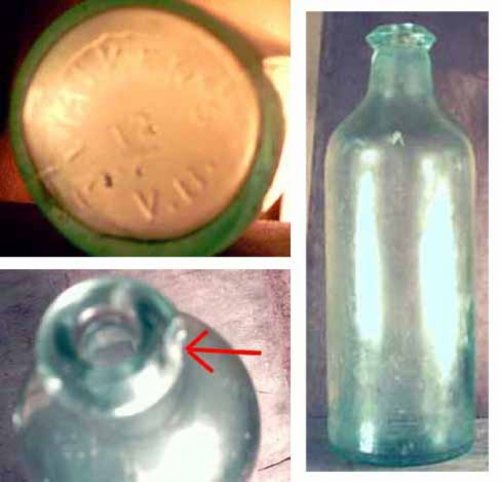
Hi everyone! I hope someone can help me out with some questions here. Ron, this is the bottle with a chip that we dug this last summer and I mentioned that I want to attempt a repair on using your method. So these are the before pics! (Probably go into the cities tomorrow to pick up more resin.) But I wanted to ask you and the group about this bottle. Normally I won't keep bottles if they have a chip or crack (that may soon change as I wish I would have kept some now, for my own display) This bottle is 8 1/2 inches tall. Very thick primitive glass. On the bottom it is embossed with J. Walker's (the "J" is visible just to the left of the number 12 in center of picture below.) again sorry for poor quality of picture and cheepo camera.) Under the center no. 12 are letters V.B. Here are my questions? Just what is known about this bottle? I've always associated J. Walker's with booze (as in Johnny Walker's Red) But what little I did find about this bottle (I think from Kovel's) is it a bitters. Not much else found though, and I wonder if it was same company? The red arrow points to the slight chip in the lip. This is what I want to repair. I thought about just grinding (light shaping...rubber grit) it down then wet sand and buffing it out to clear. But think I will try the resin casting technique. And post those after. I'm not sure about the rarity of this bottle, but in all of your opinions would a chip like this render a bottle completely worthless (e.g unmarketable?) I just thought I would pass these pictures along in case no one has ever seen the J Walker's bitters yet. I couldn't find any pictures on the web, but would appreciate any links or information (please) if anyone has any. Thanks again!
sc
Hi SC !
Your Walker's bottle is a label only Bitters. The V.B. on the base stands for Vinegar Bitters. The label reads : Dr. Walker's California Vinegar Bitters . R.H. McDonald Drug Co. , 528 , 530 , and 532 Washington Street New York . With branches in London and San Fransisco
Dr. Walker first started his business located at the corner of American and Channel Streets in Stockton , California . Later he moved to New York. He had Indians gather Herbs in Knights Ferry and shipped to him in Stockton. He advertised his Bitters " free of alcohol " , but used Brandy as a perservative. He was struck by a locomotive and killed. His estate was valued at several million dollars.
It was an American Bitters that was exported for sale to the Canadian Provience of Quebec in 1897.
The 1872 Almanac reads : J. Walker 32 and 34 Commerce Street New York and San Fransisco . Crusade Temperance Almanac , Farmer's Hand Book of Useful Information , and Vinegar Bitters Almanac, 1874 , 1875 , and 1879.
Your Walker's is quite common in Aqua and not very valuable monetary wise. But , there are Green ones out there that are scarce to rare .
Hope this helps , Brian
hi Brian, Yes, it helps very much! Thank-you. That is a great little piece of history behind a bottle that I had almost tossed. Really appreciate the help. (Now I know what the VB stands for.) I'll do the repair and who knows maybe come up with the green next summer. One thing I have found out about our dump, the Spring floods usually cough up something new. Thanks Brian!
sc
Hey SC !
Here's a link to an ebay auction of a Labeled Walker's V.B. if you would like to see what the label looked like. http://cgi.ebay.com/ws/eBayISAPI.dll?ViewItem&category=890&item=6146077813&rd=1
Brian